Set Up a Virtual QNX Target
This page describes two ways to set up a QNX virtual target: using bash commands or using Visual Studio Code. These instructions were written for Ubuntu and may require adjustments for other Linux distributions.
Official QNX Docs
Note
On this page, commands preceded by # indicate that the command is run in the terminal window of a running target.
Prerequisites
Install the following packages via
apt.sudo apt install qemu-system-x86 qemu-utils sudo apt install bridge-utils sudo apt install libvirt-clients libvirt-daemon-system sudo apt install net-tools
Create Target Using Bash
Run bash if you aren’t already.
bashSource
qnxsdp-env.shfrom your QNX installation.source ~/qnx800/qnxsdp-env.shExample Output:
QNX_HOST=/home/flux/qnx800/host/linux/x86_64
QNX_TARGET=/home/flux/qnx800/target/qnx
MAKEFLAGS=-I/home/flux/qnx800/target/qnx/usr/include
Check that
mkqnximageis found.which mkqnximageExample Output:
/home/flux/qnx800/host/common/bin/mkqnximageCreate a directory to hold the VM image.
mkdir ~/qnx-vm
cd ~/qnx-vm
Run
mkqnximageto build the VM. Use--runto run the target.mkqnximage \ --type=qemu \ --arch=x86_64 \ --ssh-ident=$HOME/.ssh/id_ed25519.pub \ --runUpon connection to the virtual target, the following will be printed to the terminal screen.
SeaBIOS (version 1.16.3-debian-1.16.3-2)


iPXE (https://ipxe.org) 00:03.0 CA00 PCI2.10 PnP PMM+3EFCACB0+3EF0ACB0 CA00


Booting from ROM..
non UEFI or UEFI+CSM boot
ACPI table not found (0x4746434d)
overriding mask for controller 2, vector_base 0
---> Starting slogger2
---> Starting PCI Services
---> Starting fsevmgr
# ---> Starting devb
---> Mounting file systems
Path=0 - Intel 82371SB
 target=0 lun=0     Direct-Access(0) -          QEMU HARDDISK    Rev: 2.5+
Path=1 - Intel 82371SB
 target=0 lun=0            CD-ROM(5) - QEMU     QEMU DVD-ROM     Rev: 2.5+
---> Mounting file systems
---> Starting Networking
---> Starting sshd
---> Starting misc

To exit QEMU, type <ctrl>a x

Process count:22
Startup complete
QNX noname 8.0.0 2025/07/30-19:24:08EDT x86pc x86_64
Press
<Enter>to bring up the prompt, indicated by#. Enter the commanduname -ato confirm that the target is running.Example:
# uname -a
QNX noname 8.0.0 2025/07/30-19:24:08EDT x86pc x86_64
Run Target After Creation
After creating the target, navigate to the target directory (in this case ~/qnx-vm) and execute the following command. Always source qnxsdp-env.sh before invoking mkqnximage.
mkqnximage --runErrors When Running mkqnximage
Error: Cannot Find brctl
Solution: Install bridge-utils:
sudo apt install bridge-utilsError: SSH Identity File
You may encounter this error:
To allow root ssh, you need an ssh identity file. You probably want to use an option such as: --ssh-ident=~/.ssh/id_ed25519.pubSolution: Include the --ssh-ident parameter in the mkqnximage command.
--ssh-ident=$HOME/.ssh/id_ed25519.pubIf you do not already have an SSH key set up, follow instructions from this page.
Error: Unable to Run vmrun
You may encounter this error if you use --type=vmware
Unable to run vmrun. If you have VMWare Workstation Pro installed
you will need to add its directory to your PATH. If you are using
VMWare Workstation Player you will have to open the virtual
machine local/vmware_files/vmware.vmx directly.
Solution: Install VMware. Note that in this example we are using qemu instead of VMware.
Create Target Using Visual Studio Code QNX Toolkit
Select the QNX extension from the activity bar. From
QNX TARGETS, click the button labeledAdd new QNX Virtual Target.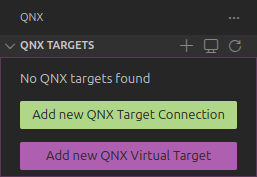
Select the virtual machine type. In this example we are using
qemu.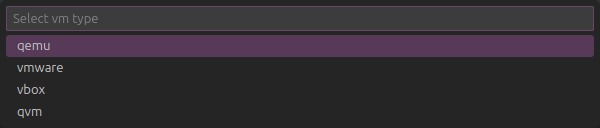
Select the architecture.

For
Enter extra mkqnximage options, add--ssh-ident=/path/to/public/ssh/key.Make sure to use the full path, i.e.
/home/usernameinstead of~. If you do not have an SSH Key set up already, follow instructions here.
In the sidebar under
QNX TARGETS, a new target should be visible.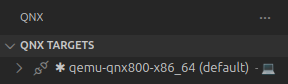
The following should be printed to the terminal window.
SeaBIOS (version 1.16.3-debian-1.16.3-2)


iPXE (https://ipxe.org) 00:03.0 CA00 PCI2.10 PnP PMM+3EFCACB0+3EF0ACB0 C0


Booting from ROM..
non UEFI or UEFI+CSM boot
ACPI table not found (0x4746434d)
overriding mask for controller 2, vector_base 0
---> Starting slogger2
---> Starting PCI Services
---> Starting fsevmgr
# ---> Starting devb
---> Mounting file systems
Path=0 - Intel 82371SB
 target=0 lun=0     Direct-Access(0) -          QEMU HARDDISK    Rev: 2.+
Path=1 - Intel 82371SB
 target=0 lun=0            CD-ROM(5) - QEMU     QEMU DVD-ROM     Rev: 2.+
---> Mounting file systems
---> Starting Networking
---> Starting sshd
---> Starting misc

To exit QEMU, type <ctrl>a x

Process count:22
Startup complete
QNX qemu-qnx800-x86_64 8.0.0 2025/07/30-19:24:08EDT x86pc x86_64
---

#
At the prompt, type
uname -ato confirm that you are running the virtual target.# uname -a QNX qemu-qnx800-x86_64 8.0.0 2025/07/30-19:24:08EDT x86pc x86_64 # ---
Errors With Virtual Target Creation in Visual Studio Code
Error: Non-Existent SSH Key File
You may encounter the following error in the terminal window:
--ssh-ident refers to non-existent file: ~/.ssh/id_ed25519.pubSolution: If you are confident that the path provided for the public key is correct, use the full path instead of using ~ for home.
Example:
--ssh-ident=/home/flux/id_ed25519.pubError: dnsmasq Not Running
You may encounter this error in the terminal:
dnsmasq not running on br0 for DHCP service
You might be better off installing libvirt so you can use virbr0.
To do this, run:

    sudo apt install libvirt-clients libvirt-daemon-system

or whatever is appropriate for your system.

Need to configure networking for QEMU
Unable to configure networking please run:
    /home/flux/qnx800/host/linux/x86_64/../../common/mkqnximage/qemu/check-net
Command exited with error code: 2
Solution: Install libvirt:
sudo apt install libvirt-clients libvirt-daemon-system